From a viral social media video to a pastry chef’s insights, learn the secrets for making the most out of parchment paper piping bags to decorate detailed cakes and handle tempered chocolate.
In a pastry chef’s toolbox, you may find items like a candy thermometer, a bench scraper and an offset spatula that professionals simply can’t live without. You may be surprised to find out that one of the principal, indispensable tools a pastry chef often relies on is a DIY project of sorts. According to Pastry & Baking Arts Chef-Instructor Stephen Chavez, a parchment cornet is as valuable, if not more than, a store-bought pastry bag when it comes to decorating cakes.
We recently shared tips on making a cornet from a sheet of parchment paper on our TikTok account @iceculinary, garnering over 4.8 million views and almost 2,000 comments. Here's a deeper dive into this fundamental pastry technique that covers the origin of this humble parchment tool, other methods for making a cornet and the best ways to use it.
How to Use the Piping Bag
ICE's Dean of The Art of Cake Decorating, Toba Garrett, explains that it is essential for a pastry chef to master using paper cones in her book, “Professional Cake Decorating." She believes that “paper cones provide control when piping — the smaller the bag, the greater the control.” Best of all, she notes that this disposable tool reduces the time spent cleaning up any kitchen messes. According to Chef Chavez, cornets are especially great for working with chocolate. He points out that a traditional pastry bag can quickly lose its shape and become floppy when exposed to the warmth of a liquid. The result is minimal control when piping delicate features on a pastry or cake. Made from silicone-coated parchment, cornets can hold liquids well, without leaks or spills, and maintain shape despite contact with heat. Additionally, Chef Chavez comments that paper cornets can provide an eco-friendly solution for plastic pastry bags.
Tracing the Technique Back
Pastry chefs kept the cornet somewhat of a secret in the mid-to-late 1850s in Europe until the French-born chef Urbain François Dubois brought the handy kitchen hack to light. He recounted the wonders of this tool in his book, “Artistic Cookery: A Practical System Suited for the Use of the Nobility and Gentry and for Public Entertainments,” in 1870.
This pointed, sturdy medium for decorating cakes gained popularity quickly once exposed. Bakers and pastry chefs adopted the tool for its appropriate stiffness and barrier to help keep away the heat radiating from their hands that could affect the icing or chocolate’s consistency and the control they needed for decorating their creations. Much like a paintbrush, these paper cones helped cake decorators achieve the finesse required for intricately detailed decorations, which can’t be accomplished with most other pastry tools.
How To Make a Traditional Cornet
To make two large-sized, standard cones, fold a large piece of parchment paper in half, crosswise to form two equally sized triangles. Crease the paper using an offset metal spatula. Then, slightly lift the folded parchment paper to position the offset spatula’s sharp edge at the top of the crease. At a 45-degree angle, run the offset spatula through the crease to cut the parchment, hold the paper steady with your free hand, and make two independent paper triangles.
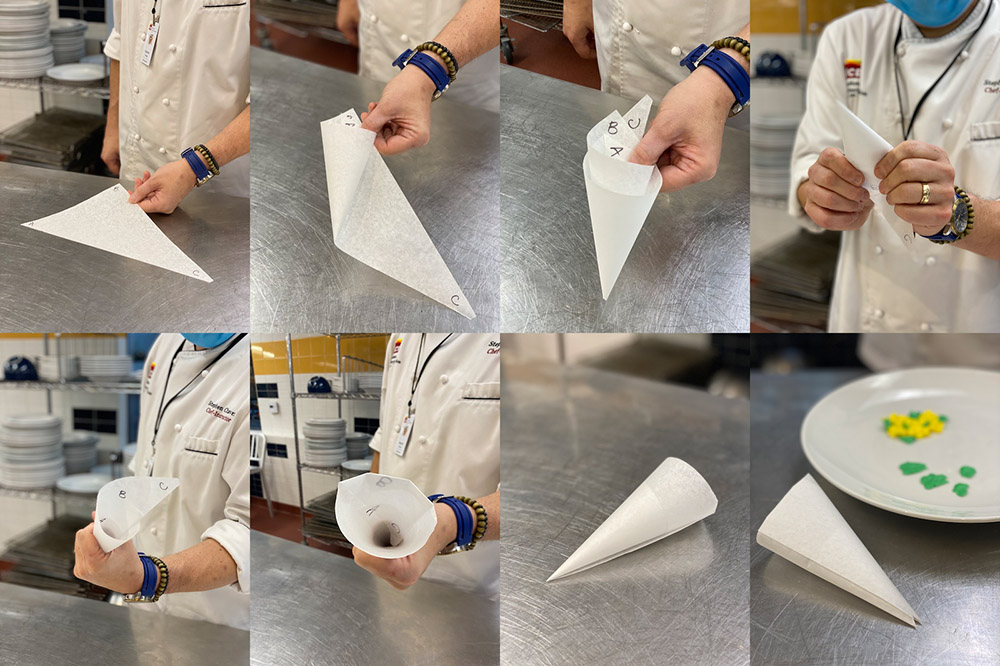
Label the corners of the triangle A, B and C, with the C on the 90-degree corner. Point corner C towards your body. Using your dominant hand’s thumb and pointer finger, grab the edge of corner A and wrap it towards your body to form a cone, with the points of A and C aligned and touching. With your free hand, repeat the process in the opposite direction, so that corner B wraps around the existing cone shape to meet the points of corners A and C.
Lastly, hold the cone with both hands — thumbs inside the cone — and fold corners A, B and C into the cone to secure the edges from coming undone. Now you’re ready to start using the signature parchment paper cone.
Alternative Ways to Make a Cornet
To maximize a large parchment paper sheet, Chef Chavez says you can make eight cornets out of one sheet of paper. Fold the paper in half — like a book — and cut through the crease. Then, stack the two sheets together, and repeat the previous step to create four individual papers. Lastly, fold the four sheets of paper on a diagonal, and cut through the crease to yield eight triangular sheets for making cornets.
Aside from a traditional cornet, Chef Chavez explains that you can also create a leaf tip for instances where you don’t have a star tip on hand. Cut a small V shape into the cornet’s pointed end to make decorative flowers or leaves to embellish a cake.
The Professional Way to Use a Cornet
Make several to keep on hand at all times.
Chef Chavez recommends making several cornets to keep in your pastry toolbox at all times. Because these paper cones do not occupy much room, keeping a few ready-to-go cones can save you from a sticky situation in the kitchen. If you have perfectly tempered chocolate ready to decorate a cake, you’ll want to work quickly to ensure it does not harden before you can use it. Stack a few cones together and fold flat to minimize the space the paper occupies in your kit.
Use for savory plating, too.
Expand the horizons of a cornet beyond chocolate work by using it as a tool for plating intricate dishes. When using a viscous or thicker liquid for plating, a cornet may come in handy for assisting in accuracy and precision.
Roll away from the seam.
Once you’ve created your paper cone and filled it up with your icing or chocolate, Chef Chavez recommends sealing the cornet’s opening by rolling away from the seam to create a tighter and more compact cone. If you roll towards the seam, your mixture may begin to leak and your paper cone may come undone.
Use your fingers to tighten the cone.
Chef Chavez explains that by holding the cone with your pointer fingers and thumbs, you can use the international money sign, finger motion to tighten the cone. Keeping your thumbs steady in the inside of the cone, use your pointer fingers to pull away from the pointed end of the cone. This motion will help create a tighter cone with a finely pointed peak.
Practice makes perfect.
Chef Chavez believes that anyone can master this essential pastry technique after a few rounds of practice, as with most kitchen skills.
See more from Chef Chavez in the classroom at @chefsoulman, and study professional techniques in ICE's Pastry & Baking Arts program.