Pastry & Baking Arts Chef-Instructor Kierin Baldwin put her spin on this classic summer treat for National S’mores Day.
S’mores have been around since 1927, and there’s a reason why this campfire classic has its own day, which falls on August 10. Who can resist a toasted, golden-brown marshmallow, puffed, fluffy and gooey, and sandwiched between graham crackers and melting chocolate?
Fans have been innovating on this dessert snack for years, swapping in peanut butter cups and cinnamon graham crackers, to make this treat their own.
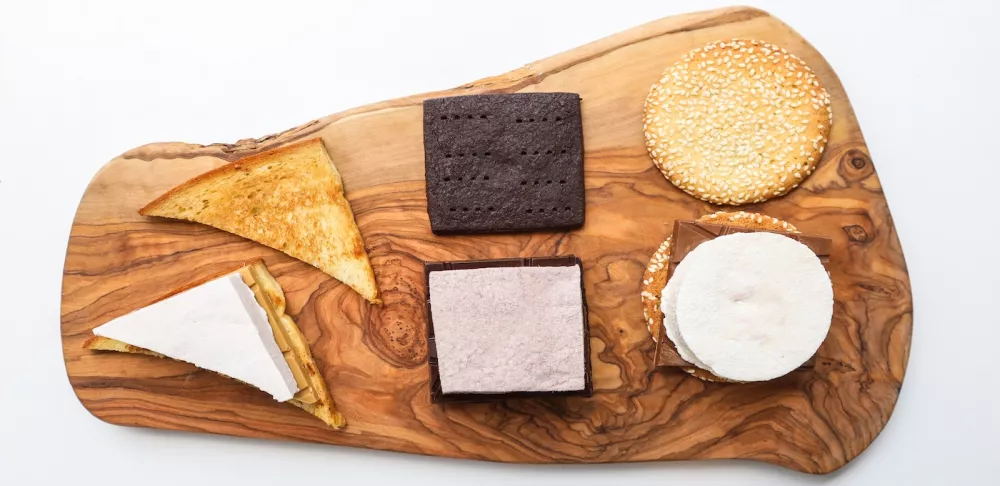
Pastry & Baking Arts Chef-Instructor Kierin Baldwin took it a step further, creating three unique s’mores with distinct flavor profiles: Sesame-Miso, Cinnamon Toast and Brooklyn Blackout.
“To put my own twist on the traditional s’more, I thought about variations on its three elements, considering different types of cookies and chocolate and figuring out what flavored marshmallows could connect them,” Chef Kierin says. “I drew on classic flavor combinations, dishes with chocolate as an element, and flavors I like. For example, the Sesame-Miso S’more is inspired by a tahini chocolate chip cookie that I love.”
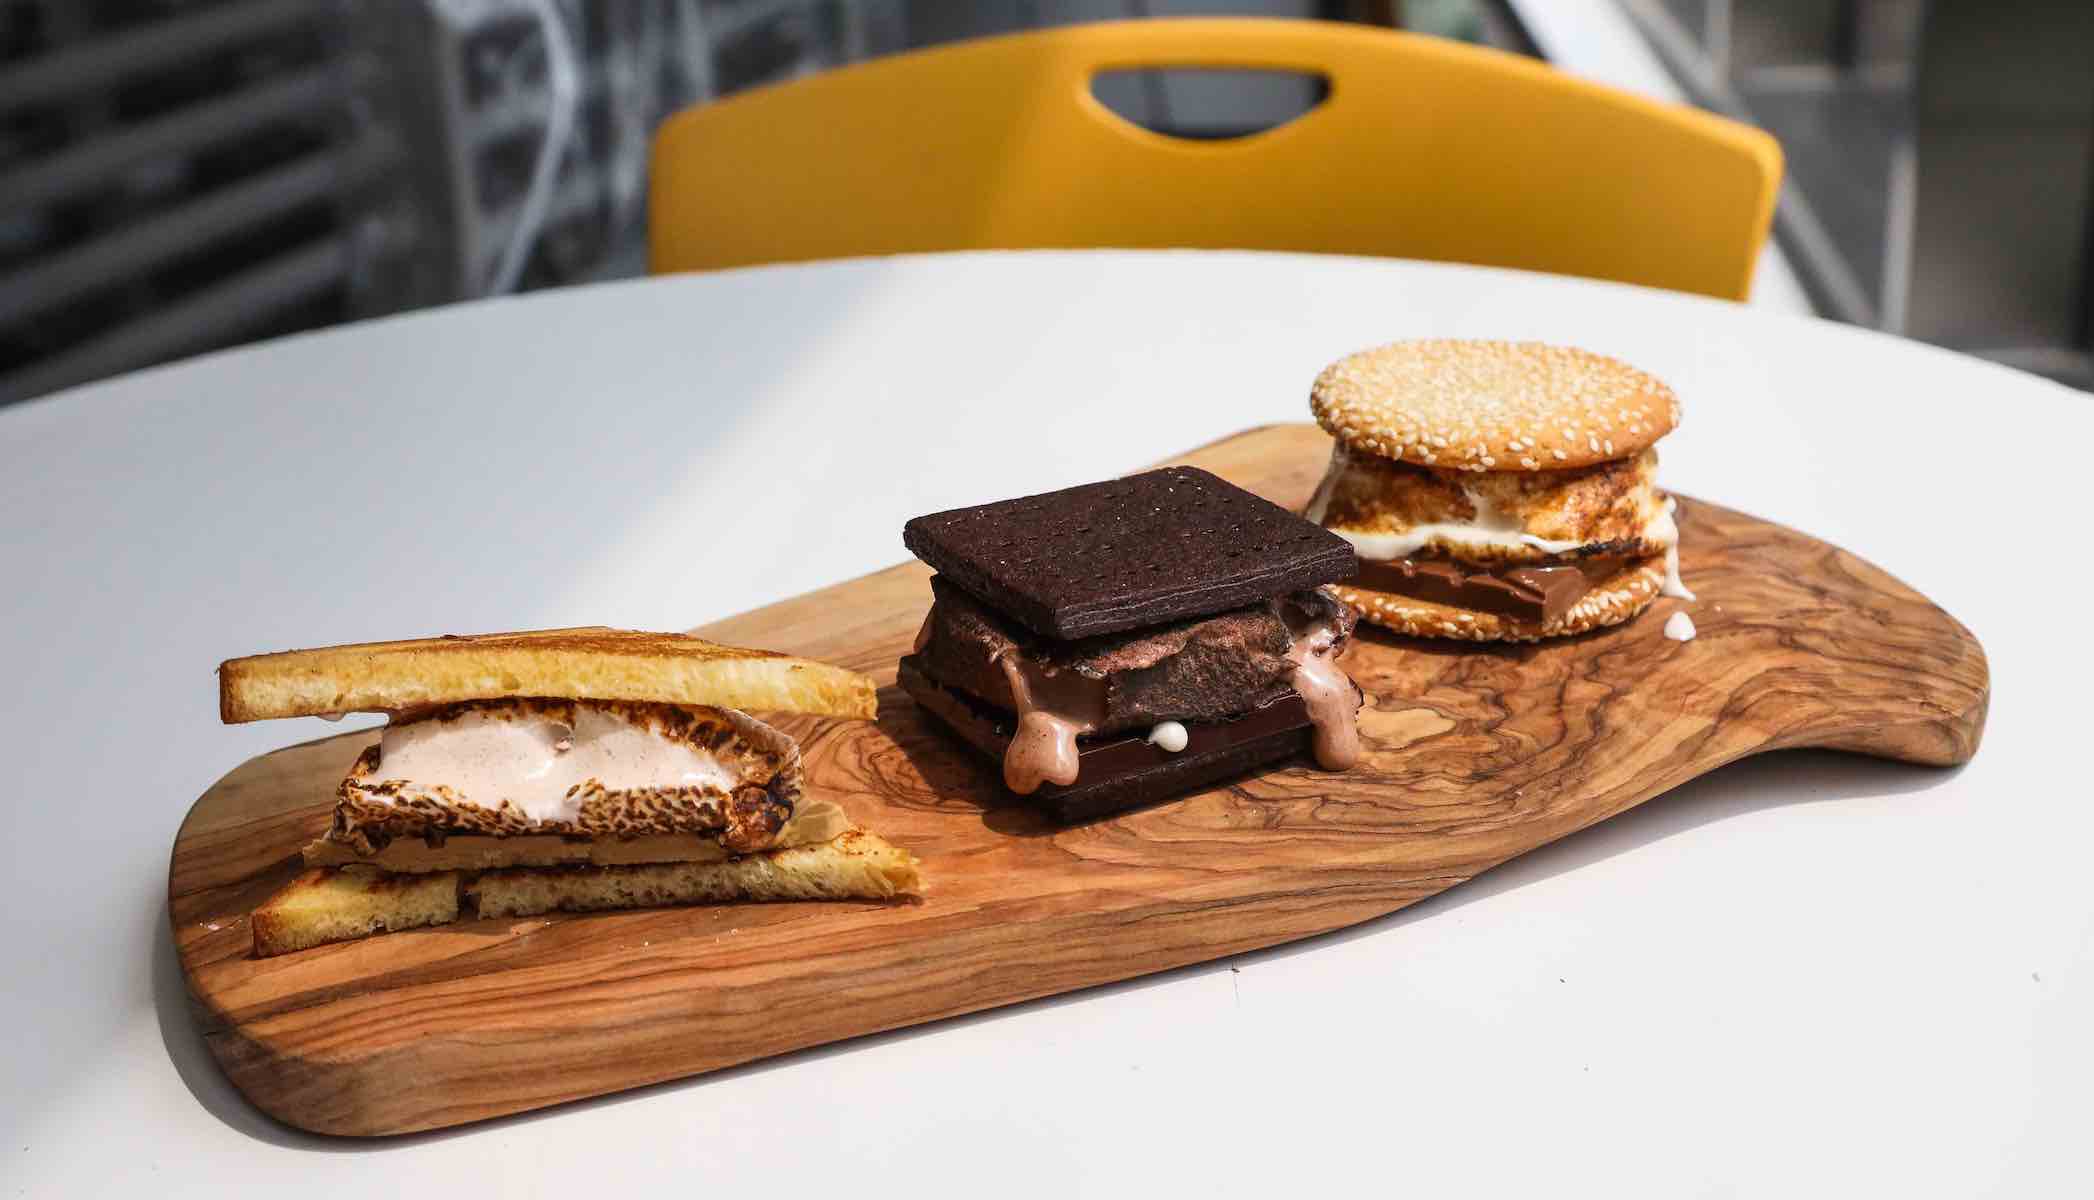
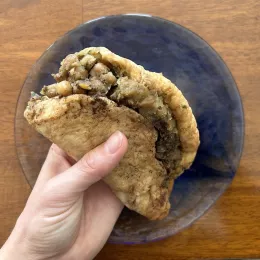
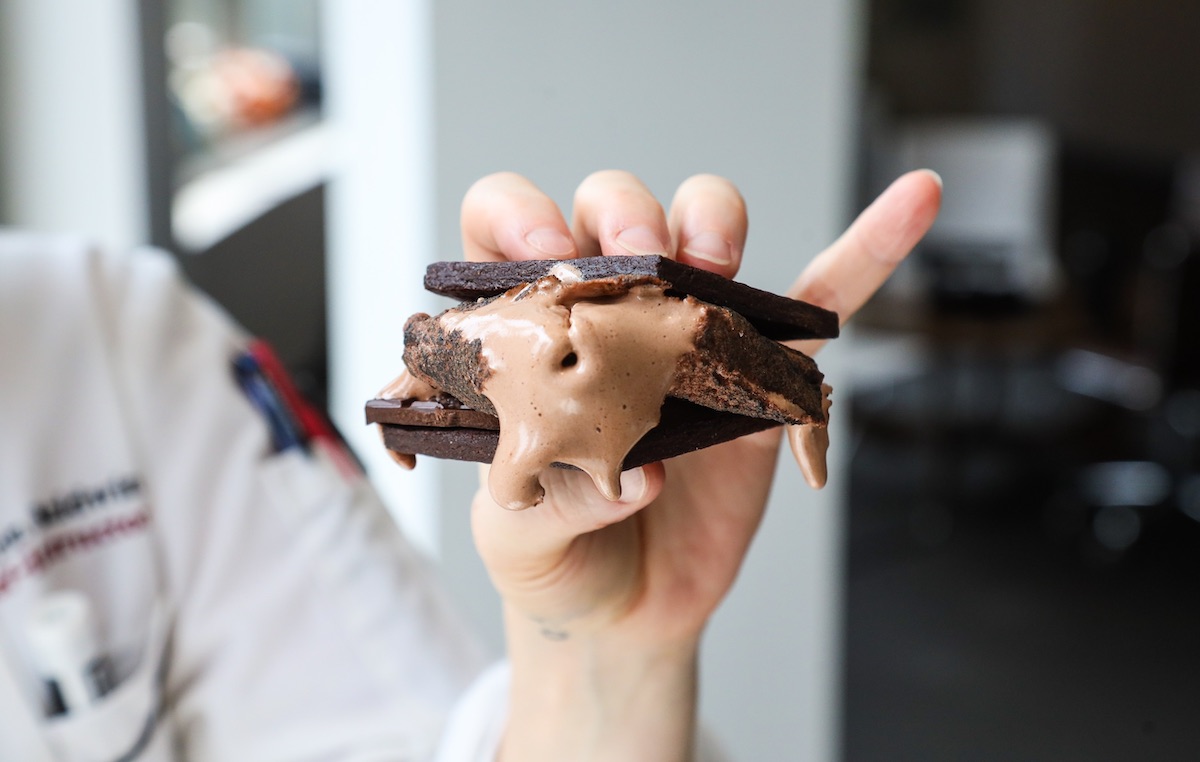
The Sesame-Miso S’more consists of sesame cookies, milk chocolate and a miso-flavored marshmallow. A chocolate lover's dream, the Brooklyn Blackout utilizes chocolate cookies, a chocolate marshmallow and dark chocolate. And playing on cinnamon toast cereal, the last s’more incorporates griddled, buttered white bread, caramelized white chocolate and a cinnamon-flavored marshmallow.
Chef Kierin worked with marshmallows during her time in restaurant pastry kitchens in New York City. Though they weren’t served as s’mores, she made marshmallows that were incorporated in petit fours and others that were flavored and served on cookie plates at The Dutch, one of her former restaurant kitchens.
Flavoring Marshmallows
There are a few different methods you can use to flavor marshmallows, according to Chef Kierin: “If you are adding dry flavorings, such as spices, you can usually add them without making many other adjustments to the recipe."
For a subtle hint of flavor, adding liquid flavorings in a small quantity, like vanilla extract, won’t require a change to the recipe either. Alternatively, replacing some or all of the water for the gelatin bloom with a flavorful liquid — like juice or a fruit puree — can work.
“You may need to adjust the quantity of gelatin depending on what liquid you use, but it will vary from flavor to flavor,” Chef Kierin says.
Note that alcohol and some tropical fruits inhibit gelling, so you may need to adjust the recipe further if using those ingredients. Additionally, Chef Kierin recommends being cautious when adding ingredients with high fat content.
"You do have to avoid adding fat to the marshmallows, since this inhibits them from foaming as they whip," she says. "For something with a small amount of fat, such as cocoa powder, you can add a little extra gelatin to compensate. For anything with a higher amount of fat, you will need to make adjustments in the amount added, the amount of gelatin or the way it's incorporated, such as adding it as a swirl rather than fully incorporating it.”
Homemade s’mores are endlessly customizable. It may take some testing and research to get the marshmallows just the way you’d like, but that’s the same for any dish.
The recipe for Chef Kierin’s Sesame-Miso S’mores is below. Let us know in the comments if you’d like recipes for the other two!

Ingredients
- 24 sesame cookies (recipe below)
- 12 miso marshmallows (recipe below)
- 2-4 good quality milk chocolate bars, cut in halves or thirds to fit the sesame cookies
For the Sesame Cookies:
Makes approximately 24 cookies (2 1/2" wide x 1/4" thick)
- 115 grams unsalted butter
- 85 grams sesame tahini
- 200 grams granulated sugar
- 1 large egg
- 1 large egg yolk
- 1 tsp vanilla extract
- 150 grams all-purpose flour
- 1/2 teaspoon baking soda
- 1/2 teaspoon baking powder
- 1 teaspoon fine sea salt
- Sesame seeds, as needed
For the Miso Marshmallows:
Makes one quarter sheet tray, or approximately 12 marshmallows (2 1/4" round)
- 215 grams glucose syrup
- 320 grams granulated sugar
- 125 grams cold water
- 31 grams silver sheet gelatin, halved
- 100 grams red miso paste
- 150 grams cornstarch
- 150 grams confectioner’s sugar
Directions
For the Sesame Cookies:
- Combine the butter, tahini and granulated sugar in the bowl of a mixer and beat with the paddle attachment until light and fluffy.
- Gradually add the egg, egg yolk and vanilla extract to the creamed butter mixture, scraping the bowl down to incorporate the butter evenly and to emulsify the mixture.
- Combine the flour, baking soda, baking powder and salt, and add them to the mixer bowl. Paddle until the dry ingredients are just incorporated, scraping down the bowl to evenly mix everything.
- Place the cookie dough directly onto a sheet of parchment (you do not need to put any flour on the parchment) and put a second sheet of parchment on top. Roll out the dough until it’s about 1/4-inch thick and then place it in the refrigerator. Chill until the dough is firm.
- While the dough chills, preheat the oven to 350˚F.
- Once the dough is firm, cut it into 2 1/2-inch wide circles. (The parchment should pull easily away from the dough if it is firm. Before cutting, pull the parchment off one side, replace the parchment and then flip the dough to the other side and release the second sheet of parchment. The cookies should now release easily from the parchment as you cut them.)
- Dip the top of each cookie in sesame seeds and place about two inches apart on a baking sheet.
- Bake until the cookies are lightly brown on the edges, approximately 10-15 minutes.
For the miso marshmallows:
- Combine the glucose syrup and sugar in a small pot and add just enough water to wet the sugar.
- Place the scaled quantity of cold water (125 grams) in a mixer bowl and add the halved gelatin sheets a couple at a time to be sure they are all immersed in the water. Allow them to sit for 5-10 minutes to soften.
- Place the miso paste in a heat-proof bowl.
- Bring the glucose and sugar mixture to a boil and continue to cook until it reaches 236˚F.
- Pour a small amount of the sugar syrup into the red miso paste and stir to loosen it up.
- Pour the rest of the sugar syrup over the bloomed gelatin and stir to be sure all of the gelatin dissolves. Add the miso paste and whip the mixture using the whisk attachment until it has cooled almost to room temperature. This will take about 10-15 minutes.
- While the marshmallow whips, prepare the pan: Mix the cornstarch and confectioner’s sugar to combine them thoroughly. Spray a quarter sheet pan with non-stick spray and then place a piece of parchment paper on the pan so it covers the bottom of the pan and comes up two of the sides. (It doesn’t really matter if you do this the short way or the long way; it just makes it easier to lift the marshmallows out of the pan once they are set.) Spray the parchment with non-stick spray and then sift a thin layer of the cornstarch mixture over the whole pan.
- The marshmallows are done whipping when the mixture has gained volume, thickened and lightened. It will stop looking glossy and start to have a matte appearance. It will be thick enough that strands of the mixture pull from the side of the bowl as the whisk spins. Usually, the bowl will feel like it is only slightly warm to the touch at this point.
- Pour the marshmallow mixture onto the prepared pan and spread it out as much as possible with a silicone spatula. (It will be sticky and hard to spread. Just spread it enough to mostly fill the pan.)
- After it’s spread out somewhat, dip your hands in cold water and sprinkle a bit over the top of the marshmallow. Dip your hands again and then use the flats of your hands to gently but quickly pat the marshmallow down into an even layer that fills the pan. If your hands stick just dip them in the water again.
- Once the marshmallow is spread evenly, put them in the fridge to set for about an hour or until most of the water has evaporated from the top of the marshmallows.
- Once the marshmallow has dried out on top, sift a thin layer of the cornstarch mixture over the top of the marshmallows then wrap the tray and let them continue setting overnight at room temperature.
- The next day, cut them into 2 1/4-inch circles using a round cookie cutter. Clean the cutter with warm water and dry between each cut. Toss the finished marshmallows in the cornstarch mixture to lightly coat them and hold them at room temperature.
For Assembly:
- Place a piece of chocolate on the bottom of a cookie.
- Place one of the marshmallows on a metal skewer or fork and toast it using a stovetop, kitchen torch or campfire, whichever you have handy until they are nicely browned and squishy. (You can also place them on a cookie and broil them quickly if that's the most convenient.)
- Place the marshmallow on the chocolate on top of the cookie, top with another cookie and give it a nice squish so it oozes irresistibly. Enjoy immediately!
- Repeat with the remaining cookies, marshmallows and chocolate.
Interested in exploring these confections? Practice making marshmallows and dive into other desserts in Pastry & Baking Arts at our New York City or Los Angeles campuses or in the online program.